Showing posts with label Abundance from Abandoned. Show all posts

Monday, January 5, 2026

Restyling your old jeans

Are you working on a project to restyle your old jeans?

Before you start on the project, do a search online to find out what is currently fashionable.  I did a search for "what type of jeans currently fashionable" and this is what I found:

"Currently fashionable jeans feature loose, relaxed fits like wide-leg, baggy, and barrel-leg styles, often with lower rises, offering comfort and an effortless vibe, but classic straight-leg, bootcut, and even updated skinny jeans with stretch and higher rises are also back, showing a mix of comfortable volume and streamlined looks. The key is versatility, with a mix of looser silhouettes, classic straight cuts, and retro flares dominating, often in classic washes like indigo, dark blue, or even white/beige."

Take note of these points:

-loose, relaxed fits like wide-leg, baggy, and barrel-leg styles.
-retro flares 
-often with lower rises.
-looser silhouettes, classic straight cuts of comfortable volume and streamlined looks
-bootcut, and even updated skinny jeans with stretch and higher rises.

Go to Pinterest and do a search for:

-wide-leg, baggy jeans
-barrel-leg jeans
-retro flares jeans
-updated skinny jeans

Do you see any of the style there that you can use to style your jeans?  

Through my search there for "sew a barrel-leg jeans", I found out from watching this video that, if all you have are straight or stream-lined jeans, you will have to sacrifice two pairs of good jeans to create one that is baggy.


It may be a better idea for you to check your parents or older siblings' closet to see if they have any jeans from the 90s to early 2000s that they have outgrown to give you to work on.

You also should not have any problem finding clothes from that era at thrift shops.  In fact, it may also be cheaper for you to do so then to buy material to widen your jeans, especially if, you need to pay a tailor for the service.  It can be disappointing if the tailor is not be able to recreate exactly what you have envisioned.  

Are you good at crochet?  Crochet work is currently fashionable.  You can increase the width of the leg with crochet as shown in the following image. 


I found this idea on Pinterest.  Usually, if you click on the link provided to check it out, you will find crochet patterns similar to it.  

You can also use granny squares to increase the width of your jeans.


I have also seen crochet head scarf and tablecloth used to restyle jeans, skirts and dresses.  The following is a good example shared on Pinterest.


I have saved many restyling ideas for clothes on Pinterest.  My objective is to encourage re-using what you have by restyling it so that it looks as good as new again.  I hope you will be able to find some ideas there that you can make use of so you can enjoy wearing your old jeans again.

Wednesday, May 21, 2014

DIY Eco poo scoop

The school holiday is around the corner, what can you teach your children to make?

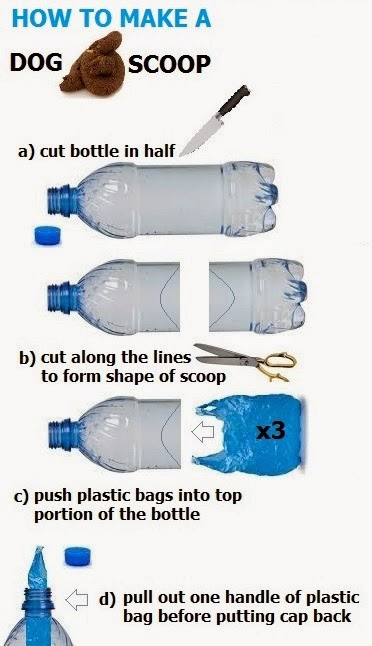
For pet lovers out there, how about learning to make a poo scoop? That way you can make use of the grocery plastic bags you have received and the bottles from soda drinks your children will be gobbling on.

Your children can also make them as gifts for their friends who have pets at home.


You do not have to cut curves on the bottle to make it look like a scoop if you do not want to.  Just make sure that the cut edges are smooth. 


I discovered that Twister 1.5L bottles works best as scoop as the bottom section of most 1.5L bottles can fit in firmly into its top section cavity so that it will not easily drop even when you swing it. 


To use Twister 1.5L bottle, you have to cut out the narrowest part of the bottle and cut 8 slits to enable it to widen to push in bottom section of bottle.  Cut curves into the edges as shown in the picture below.  That way plastic bags inserted will not be torn by sharp edges.


Are you ready to use the scoop?  This is how it works.

Share this concept with your friends.  Let us work together towards poo free parks.

P/S You don't have to mess up your home collecting grocery plastic bags.  Here is how.


Tuesday, January 1, 2008

A reminder that words can kill.

So, you like my write up about props and would like to create your own?

These are the material and tools you need:

1) Scissors
2) Rubberbands
3) Magic Pen for writing and colouring
4) Cardboard from a box

Method

1) Create the handle and write the word "Handle" on it. The handle can be in any style you like. I have created mine by drawing circles that overlap one another.


2) Reinforce the cardboard by stapling a narrow strip of cardboard to the back of the handle at the tip and mid section of the handle.


3) Create another piece to form the "T" of the handle. Write the words "With Care" on this piece.


4) Create the sharp end of the sword and write the word "Swords" in the direction as shown in the picture.


5) Staple the handle together as shown below.


This is how it will look from the front.


6) Place the pointed end of the sword on top of the handle, with words facing out.


Turn it around to check to make sure that the handle covers the first letter, "S", of the word "SWORDS".


Use the rubberbands to hold them together.


When you turn the pointed end the other way and hold it in place with the rubberbands. This is what you will get...


... a picture like this when you cannot afford a serious actor.

Monday, December 17, 2007

Drawers cum gift boxes.

Would you like to create this gift box to fit the "Chest of Drawers"?


Method:
1) Cut the bottom off the tissue box. The bottom will form the cover of the box.

2) Place the cover on the opening, as shown below, to get it to fit before stapling the sides of the cover up to hold it in shape.

3) Add thin cardboard to fit the sides and bottom of the box to reinforce it. Staple them to the box.


Here is a picture of the cover beside the box.


Place the cover on the box and this is how it will look.


Paper mache it with 1 layer of white paper to colour it or wrap it up with wrapping paper.

Here is another modified version of the "Chest of Drawers" earlier posted. This one has legs.


The legs are made of leftover strips of cardboard placed laterally to level with that of the extended end on both sides of the chest.

Monday, December 10, 2007

X'mas? A time to be merry recycling.

Christmas is around the corner. With feasting and gifts exchanging I see lots of used cards, wrapping papers and packagings, that come with the gifts we received, to recycle. Recycling is about making use of waste as raw material to make another product. So, what can we create with these if we are not sending them to the recycling centre?

How about a "Chest of Drawers" to keep all the new stuff you have received? I learned how to make one from helping out at the Holiday Camp organised by the Sungai Long Buddhist Society recently.


Here is my modified version.

Material Required

1) Cardboard from boxes
2) Used wrapping paper
3) Old newspaper
4) Used enveloped; white ones if you like to paint it, coloured if you like it as is.
5) Greeting cards
6) 3 Empty boxes. Each box should be able to fit within the width size of 22.5cm, height of 10cm and depth of 12cm. A very good example of one will be your regular tissue boxes.

Equipment
1) Ruler
2) Blade
3) Scissors
4) Glue (Make your own starch with tapioca or corn flour)

Method

Step 1

Prepare templates in the following sizes:
A) 22.5x10cm
B) 12x10cm
C) 12x22.5cm

You can use these templates to source boxes that you need for the project.

Use templates to cut out the following:

Size A - 3 pieces to form back of slot for drawers
Size B - 6 pieces to form sides of slot for drawers
Size C - 6 pieces to form top and bottom of slots for drawers

I was able to create the above pieces with a box I picked up from my fruit supplier.


Step 2
To create slots for drawers.

Each slot requires 1 piece of A, 2 of B and 2 of C. Place them in this configuration:

C directly above A
B beside (A in the centre) B beside
C directly below A

as seen in the picture below:


Step 3

Place 2 masking tapes on one side of A, as shown in the following example.


Hold it at right angle to C before pressing down the masking tape to hold them together. Do the same for the other side of A.


Place masking tapes on sides of A to join B to it. This is how it should look like.


Place 1 piece of B directly on top of sides of A and C. Place masking tapes along the sides to hold them together.


Now join the 2nd piece of B to the other side of A and place masking tapes along the sides to hold them together. This is your first slot for your drawer. Create two more of the same slots.


Now place 1 slot over the top of the other until you have all slots sitting neatly on top of the other. Place masking tapes to hold each slot to the other at the sides and back.


Step 4

If you have more cardboard to spare, even if they are thinner, you can paste them to the sides, top, bottom and back of the box to give it a smoother finish. To get the measurement right, place the box on its back to outline it size on the cupboard before cutting it out. Then place the box on its side on another piece of cupboard to outline its size before cutting it out. Do the same for the other side and the top and bottom of box. If not proceed with the paper mache.

We are going to paper mache (papier-mâché) the box with the old newspaper to give it a smoother finish. To prepare newspaper, fold 1 piece in half and half again to cut them up in strips. Divide these strips in half and half again to cut into sizes. My cut strips turn out to be about 4.5x7.5cm.

Step 5

Paste a layer of the cut newspaper strips over the box. Make sure that each strip overlaps the other slightly and covers the areas where the joints meet neatly. Dry 1st layer before adding a 2nd layer. If you are still not happy with the shape of the box, you can add another layer of newspaper strips till you are happy with its form.


Step 6

If you intend to paint your creation, use the white envelopes to form the 3rd and 4th layer of paper mache. If you do not have enough envelopes, you can use any printed white paper that is blank on 1 side. To prepare the envelope, cut along its fold to open it up. Cut out any printing or writings or plastic on the envelope. Fold each piece in half and half again and cut it up. If you are using white paper, just fold it in half and half again then cut. Fold it in half and cut till you get the size you are happy with. I used A4 size paper, and my strips turn out to be about 5.5x7.5cm.

Paste the 3rd layer first, dry it and add the 4th layer. Once it is dry, place the boxes you have collected to create the drawers into the slots to see if they fit.


To create drawers:
Cut the top of the box off to form opening at the top. Paper mache the box with coloured envelope and decorate it with cut outs from the greeting cards or used wrapping paper. Look out for instruction for drawers cum gift boxes in my next posting.

Teach your children to create their own "Chest of Drawers" and encourage them to paint them. If they create them before Christmas, you will have an insight into what they are hopping to receive and store in their "Chest of Drawers".

What better way to reduce waste than to get them what they want.