Wednesday, January 27, 2016

Midori Style Note Book with Pockets

I discovered that Japanese travellers carry with them Midori note book to record their trips.  Midori Traveler's Notebook is a leather-bound notebook.  Travellers can write down their thoughts and memories and also attached things of sentimental value that they have collected during their trips.  They can also customized their Midori note book by adding the following:

-inserts or sleeves
-different types of paper, such as, grid paper, plain paper, and colored paper.
-decorations, such as, stickers, trinkets and charms.
-string or beaded bookmarks.

These books also come with elastic bands to hold everything in place.  It can be a costly hobby to maintain if you are someone who is sentimental and enjoys recording everything in your life.   

This instructional video I found on YouTube, will give you an idea what a Midori note book is about. If you like what you see, you can consider making your own if you are not willing to buy one.


I like the concept and it inspired me to create my own note book as I have been trying to find ways to make use of old exercise books and papers that my children no longer use.

Here is what I used in this project:

1) Legal size printing paper (stained yellow over time).
2) old CD cover.
3) rubber band or thread and needle to sew.


I measure the the height and width from the inside of one side of the CD cover.


The width the paper is good enough for this project.   I marked on the paper the height that I would like my note book to be so that it sits neatly inside the CD cover.  For this CD cover, a height of 11.5cm is just right.  After marking the height, I folded the paper (horizontally) so that I have two sections of the same height.


There is a portion remaining which I was not willing to cut out.


As I did not want to waste that section, I decided to make sleeves or pockets out of them which I can use for inserting souvenirs.  To make it, I fold its corners at right angles to touch the edge of the 11.5cm section of the paper.


I then fold the pointed end by about 2.5cm so that its edge meet neatly in the centre as shown below.


Now I am ready to cut out one side of the 11.5cm section, as shown.  What I have now is a separate piece 11.5cm in height while the other piece has the angled flap to create the pocket.


Once I folded the angled flap towards the 11.5cm section of the paper, I will have 2 pieces of paper in the same height.


Once I folded the width of both sections in half, they should l00k like this.


I 
opened them up and arrange the pages, one on top of the other.  The first page is plain and I alternate it with the ones with pocket.


This is how the pages should look like with a rubber band in the middle to hold the booklet together.  I can now place the booklet in the CD cover.


If you staple or sew the pages together, you can add another set of booklet in the CD cover. However, it will not be a good idea to have too many of them in the cover as you will be sticking "flash cards" or souvenirs into the pockets.


I decided to make a cover for the CD cover since I have a cardboard on hand which is larger in size than the CD cover.  I glued both side of the CD cover to the cardboard.


I then wrapped the cardboard with leftover wrapping paper.  This is how my note book looks like with my flash cards.


You can check my earlier posting if you would like to know 
how you can make use of such a note book.

Tuesday, January 26, 2016

Midori style note book with flash card

I have been inspired by the Midori style note book used by travellers. Here is my version which I have created so that my children can use it with "flash cards" to study.


Material Required
- Paper from exercise books (I used my children's old exercise books).  


- File fastener or book binding ring.  The ring binder I used is 1.5cm in diameter.


Method
1) Cut strips of about 5.5cm in height out of each page.  That should give you 3 strips per page.  
2) Fold the paper so that the edge touches the line printed at the side of the paper.  
3) Gather folded paper and punch a hole to insert a file fastener to hold them together.

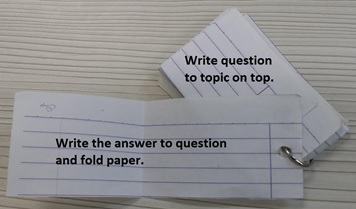
On each strip of flash card, my children can write the question to a topic they are studying on the folded top.  The answer can be written on the inside as shown.  


Now you can create a Midori style notebook with pockets so that you can slip the flash card in it. This is how my Midori note book looks like with a flash card inserted.  


You can read how I made it at the following link:


I think this is a great way to make use of old exercise books or scraps of wrapping paper and cardboard you have on hand.

Following are other ways you can make use of this note book.

- Record recipes on the blank pages and write down the list of ingredients required on the flash cards.  Slip the flash cards into the pockets created.  You can then take the flash cards out when you need to go shopping for the ingredients.
- Use it as a travel/souvenir collection book.  Insert boarding passes, tickets of shows or events you have attended into the pockets.  Write your thoughts on the blank pages.
- Save cut out of images that inspire in the pockets.  Note what it has inspired you to create on the blank pages.
- You can also use it as a journal.

Do you know that journaling is good for your emotional wellbeing?  If you are feeling down and do not know how to start journaling, read this book by Lee Crutchley, "How to Be Happy (Or at Least Less Sad): A Creative Workbook". I found a review about it shared on VaneesBabySteps YouTube channel.  At the end of the video, she flipped through the book which will give you an idea how you can go about journaling your thoughts so that you can be less sad.


When you are feeling down, note down what caused you to feel that way on a flash card.  Over time, compare the notes you have written.  You can then write on the blank pages, your reflections or points you have picked up from books or articles you read that has helped you to overcome those feelings.
 
You may also find it easier to journal in bullet style.  I have pinned some articles on ways to do that on my Pinterest board, "Bujo" which is short for bullet journal. 

Wednesday, May 21, 2014

DIY Eco poo scoop

The school holiday is around the corner, what can you teach your children to make?

For pet lovers out there, how about learning to make a poo scoop? That way you can make use of the grocery plastic bags you have received and the bottles from soda drinks your children will be gobbling on.

Your children can also make them as gifts for their friends who have pets at home.


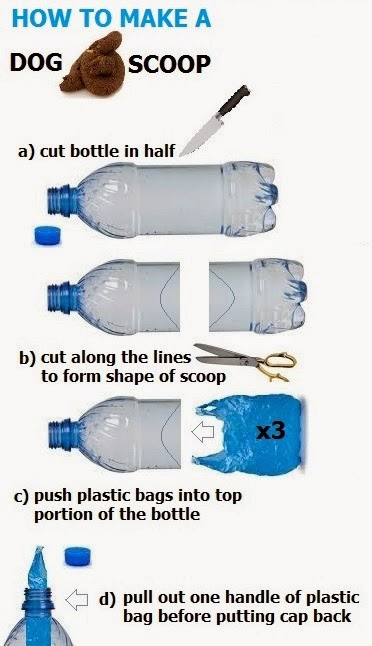
You do not have to cut curves on the bottle to make it look like a scoop if you do not want to.  Just make sure that the cut edges are smooth. 


I discovered that Twister 1.5L bottles works best as scoop as the bottom section of most 1.5L bottles can fit in firmly into its top section cavity so that it will not easily drop even when you swing it. 


To use Twister 1.5L bottle, you have to cut out the narrowest part of the bottle and cut 8 slits to enable it to widen to push in bottom section of bottle.  Cut curves into the edges as shown in the picture below.  That way plastic bags inserted will not be torn by sharp edges.


Are you ready to use the scoop?  This is how it works.

Share this concept with your friends.  Let us work together towards poo free parks.

P/S You don't have to mess up your home collecting grocery plastic bags.  Here is how.


Friday, August 23, 2013

Need chairs? Go find some cardboards!

Inspired by Japanese architect, Shigeru Ban, who can build shelters using cardboard tubes as construction material?  If you would like to follow in his footsteps, start small.  Try to build this chair for yourself.


Once you get the knack of it, you can figure out how to create a 2-in-1, in this case, a bed cum chair convertable.


Need more inspiration?  Watch this video then and see if you can create the same.  A Slinky Chair to seat from 1 to 10 people.  One that you will never get bored with as you can change its form in a variety of shape.


Sunday, August 4, 2013

Need a drum? Go find a cup instead.

Mummies, if your kids are asking you for expensive musical instrument like a drum, maybe you should get them to show if they have the talent for music by getting them to play with a plastic cup.

Here is a video to give you an idea what using a cup as a musical instrument is like.


It can also be done solo.  You can find a rendition by Calvin Ho on SoundCloud.


Monday, October 5, 2009

Cardboard box? Great for lantern.

Would you like to make the lantern I created for my son this year?

Go find a good pair of scissors, an empty cardboard box, 16 rubber bands and follow these steps. I used a box for packing a 17" monitor to create this lantern.


If you would like to create templates for the lantern to keep for future reference, here is how each piece should look like.


Method:

1) To draw the circles to form the top (1 pc) and base (1 pc) of the lantern, look for 2 plates with one about 3-4cm larger than the other in diameter.

24cm in diameter

20cm in diameter

2) Where there are straight lines marked around the circumference, cut slits through about 2-3cm towards the centre for both circles. The width of each slits depends on the thickness of the cardboard.

Here is a photo of a slit I made at the base.


Note: You can see that I have included a cover from a biscuit tin to protect the base from being damaged by lighted candle and rubber bands to secure the panels to the base.

3) The slits will enable you to slot in panels "C" (8 pcs) to form the sides of the lantern. The length of my panels are based on the height of the box I used, which came up to about 41cm. The width of the panel is 6cm.

41x6cm

4) Once you have cut out 8 pieces of panel "C", cut along dotted line marked on the template to shape the panel.

5) At where you see straight lines, cut a slit of 1cm through at the top and bottom of each panel.

6) Do not discard the cut offs from the base of each panel. Shape the cut outs (8pcs) to form a semi circle before cutting a slit in the centre along the diameter as shown below.


7) Now cut out "D" (16 pcs) to decorate the lantern. The length should be double the width of panels "C". Mine came up to 12x4cm. Cut at dotted lines to shape them.

12x4cm

Note: Two pieces of "D" will be required to decorate each panel. It will only be stapled to the panels, one on each side, after all panels have been inserted to the top and base of the lantern.


To assemble:

1) Get your 16 rubber bands ready. Secure two rubber bands to the base of each panel "C" as shown here.


2) Bottom to bottom, slot all panels to base, circle "B". The slits at "B" should sit between the "V" of the rubber bands which will hold each panel in place.

3) Slit to slit, top to the top, slot the panels to circle "A".

4) Staple "D" one and each side of panel "C", right below circle "A". Then push a semi cirlce into each panel as shown here.


5) At the top of lantern, cut a smaller circle in its centre. Punched two holes opposite each other. Push a string through one hole then the other end to the other before tying knots at each end. I used a string that I removed from a paper bag I have.

6) You can decorate it further by colouring it or sticking coloured papers on it.

7) Your lantern is ready. Just remove 1 panel to insert candle for a light up.


8) Push the panel back in place once candle is lighted. Enjoy.

If you like this, check out the free tutorials for other lanterns that I have created.

Monday, August 11, 2008

Make a hexagon shaped lantern.

Have you bought moon cakes to celebrate Mid-Autumn Festival yet? I have not but lanterns I have created for my children are ready. Here is a tutorial guide on the one I have created for Calvin.


To do the cut out for decorating the surface, check out the instruction for creating a Polish Gwiazdy. It is similar to doing a cut out for snowflakes. The design of the one I have pasted on my lantern is cut out from a square piece of paper.

Keep folding the square to cut out a triangular shape, circle or a rectangle. You can also fold it at an angle to cut. Open it up to check how it turn out before deciding if you need to do more cut outs.