I discover Hilaria Fina on Pinterest. I came across her Seed Stitch Pattern Worked in Back Loop pattern which I like very much as it is a good pattern to use for making bags.
Friday, November 8, 2024
Wednesday, January 3, 2024
Create a Versatile Bag
Do you like this versatile fanny pack cum bag I made? Do you want to learn how to crochet a bag that you can use in many ways?

The crochet stitches you should know to make this bag are:
-chain to start and get to the next row to crochet (noted as "ch" in written instructions or seen as a circle in Japanese instructions with symbols)
-single crochet (noted as "sc" in in written instructions or seen as "x" or "+" in Japanese instruction with symbols)
-slip stitch to end a row (noted as "ss" in written instructions or seen as a dot in Japanese instruction with symbols)
Nordic Hook provides the best instruction for beginners. Check out their link to "Single crochet (sc)" and you will see a video instruction tutorial. There are also photos for each step you have to make.
This is the crochet pattern that I found on Pinterest. I modified the size so I can insert the worn out fanny pack, that I currently used, in it. In that way it works like separate compartments in the new bag.

I started making the base of the bag with 8 chain and crochet up to 32 rows of single crochet (R1-R32 sc). This is how the Japanese instruction with symbols for the base will look like.

The Japanese instrucion symbol for 2 single crochet in 1 stitch looks like this.

To crochet the body of the bag, consider the next row, Row 34, as Row 1.
Do single crochet at Row 1 all around up to Row 26
= R1-26 ("x" in all stitches, ss to join to 1st "x")*, 1 chain up, turn for next row and repeat *
= R1-26 ("x" in all stitches, ss to join to 1st "x")*, 1 chain up, turn for next row and repeat *

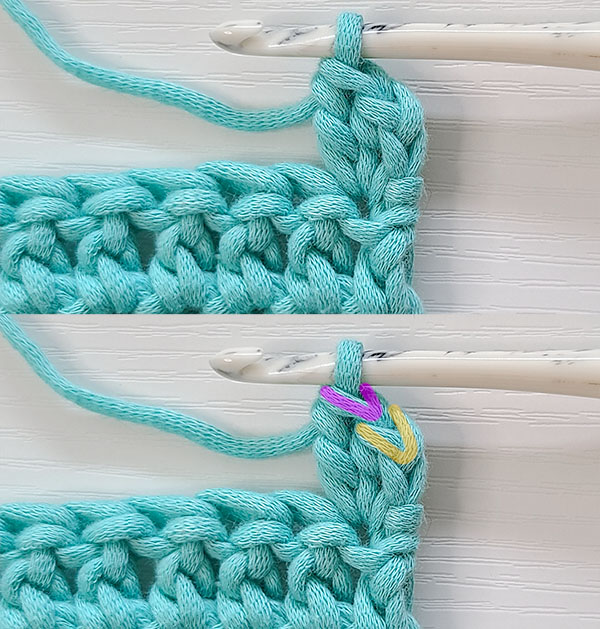
At R27, do a back loop only single crochet (blo sc). You can learn how to crochet that stitch at Nordic Hook.

The back loop only stitches will allow you to fold that row neatly. At R28 to R31 continue to single crochet all around. These are the kind of Japanese instruction symbols you will see for such stitches.

By this stage, you have completed making the shape of the bag. Let's add a flap to it...

...that can be used two ways. That is, to cover the opening of the bag (with the top folded down) or leave at the side of the body, which actually covers the pocket for the straps I need when I use the bag as a fanny pack.

I started by making 32 chains and single crochet up to 23 rows = R1-R23 sc.
I stitched the flap to the bag on the 9th row from the opening of the bag as shown above.
As I am also using the bag as a fanny pack, I must be able to hide the straps I crochet for the waist when I use it as a regular bag. I crochet slits at the top of a pocket I made in order to hide them neatly.

Then I crochet the straps to the pocket beside the slits so that they can be slipped through for storage.

To make the pocket for the straps, I started with 20 chains and single crochet till row 13= R1-R13 sc
At row 14, I single crochet all around
At row 15, I made the gap at the top by making 6 chains, then single crochet to the other side and leave a 6 chains gap
At row 15, I made the gap at the top by making 6 chains, then single crochet to the other side and leave a 6 chains gap
At Row 16 single crochet all round and slip stitch to end.
I sew the pocket to the bag, at the third (3rd) row below flap
For the left strap I made from the top of the pocket near the slit, 6 single crochet up to 32 Rows. Then I sew a buckle on to its end.
For the right strap, I made from the top of the pocket near the slit, 6 single crochet up to 23 Rows.
I attached metal rings to the sides of the bag, so that it can be used with other type of handles like this chain handle. The flap looks shorter in this photo compared to the first photo of the bag I shared because the top four rows are not folded down.

You can check out the kind of hardware you can consider using to style your bag, by watching this video:
I am able to use this bag in many different ways by:
-changing its size.
-changing its handle.
-using it as a fanny pack or a shoulder bag.
-turning it inside out to use
If I want to, I can:
-make the flap detacheable so that I can change the colour or shape of the flap.
-embellish the bag with crochet letters, heart shapes or cute or nature related patterns.
-embellish the bag with crochet letters, heart shapes or cute or nature related patterns.
Tuesday, July 25, 2023
Working on Something Versatile
I managed to design a crochet bag that will allow me to:
- change its size.
- change its colour.
- change its handle.
- use leftovers or discarded material.
I hope that it will reduce the "discard mentality" as one cannot be bored with a bag that one can personalise. You can read why I design it that way from my post, I am a GreenBeing Designer.
This is how the bag can look like. The handles are made of cords removed from a paperbag.

It is actually a container cum bag because the second layer in beige can be removed as it is just woven onto the green container with a piece of string. The small mesh crochet stitch I made on the top and lower portion of the beige layer and on the green container allows me to attach more layers to change the size of the container cum bag.
If you like the ruching crochet pattern that I used for the beige layer, you can find the instruction on how to make it at Underground Crafter.

You can learn how the small mesh crochet stitch is made at Aabhar Creations. I like the crochet instructions there because they indicate how many stitches is required to complete a pattern which is 2 for this small mesh crochet stitch.

If you are working with leftover yarns, you can decide if you want to use the ruching crochet pattern or the small mesh crochet stitch, which requires less yarn to create your layers. You can decide how many different colours you would like to use and how many rows each layer should be. You can check out my Pinterest Board for Colours and Combinations if you cannot decide on the colours to use.
You can make a bag out of the layers you have made if you do not want to have them attached to a container. Your bag is completed once you have woven a string through one end of a layer to close it up and add handles to the layer at the other end.
If you would like to include a container to your bag, you can check out the circular crochet patterns that I have saved on the following Pinterest Boads for inspirations:
Circular Base and Body Bags and Baskets
Circular Crochet Patterns
This is the crochet pattern I chose to make the container.

It is actually a pattern for making this hat for a toddler.

The thing about making a circular crochet item is that once you change the crochet pattern without increasing the number of stitches in the following rows, it will no longer be a flat piece of work. This is how mine turned out after I crochet three rows of the shell pattern.

I used two strands of 4 ply wool to crochet it. The base looks flat because I have inserted this circular packaging item for bicycles that I have in my bikeshop. It fitted perfectly.

You can make your own circular base to fit your crochet container by cutting it out of a cardboard box or from a large round plastic container. If your insert looks good, you can consider making the base with this crochet pattern I found on Pinterest as it will require less yarn to complete. As you can see from the diagram, there is an increase in one chain stitch for each row. If you continue to crochet using the pattern on the 6th (last) row, your work will go upwards to form a container.

I tend to choose net or mesh or see through crochet pattern for making bags if I intend to use reusable bags as inserts in them. I noticed that the quality of most of the free reusable bags that I received from retailers are poor. So, they will last longer when I use them as inserts.

On top of that, you can easily personalise such crochet pattern. Can you see the heart shape on this bag? It is made with a cord removed from a paperbag. You can also use leftover ribbons to weave through the stitches to create your own design.
Thursday, August 2, 2018
Repaired a Bag with Discards
I like multi-functional bags and this is one I received as a gift.

I have been using pouches since my handbag was snatched in 2005, so I like it that I can use it as a regular bag with its strap attached or as a pouch after taking the flaps out from its back pocket.
I can no longer use it as a pouch, ever since the clasps attached to the flaps were damaged.

So, I decided to repair it after figuring out what discards I can use to fix it.
Can you guess what this discarded material is? I used it to wave in the belt and give the bag support since the flaps can no longer be used.

It is a cut out from a shampoo bottle!

So, the material I needed to repair it was a black shampoo bottle and a long woven belt which makes adjusting the length to hang the pouch on the hip easy.

When measurements are required in my craft work, I usually use paper with grids on it as a guide. So, the other discard I used was a page from my children's exercise book for writing in Mandarin.

I folded the sides of the paper up so that it fits the size I need to make backing for my bag. This is the template for the bag.

I folded the template in half and half again.

Then I opened it up to mark as shown, areas to cut out for inserting the belt. The dotted lines on the templates represent the folds I made. In doing that I am able to centralize the cut outs for the belt.

I placed the template on shampoo bottle once I have cut open one of its sides. Marked it accordingly with a sharp pen. I decided to cut the width wider than the woven belt I am using so that a broader width belt can also be inserted.
This is how the backing should look like after the belt has been inserted.

I cut curved edges off the corners of the plastic sheet to prevent the sharp edges from damaging the fabric.

As the plastic backing is wider than the openings of the pocket, I had to fold the plastic in half before I can insert it.

Remember to position the clasp of the belt in the right direction so that you can buckle it.

As you can see, the bag does not slouch over with the plastic backing inserted.

I like the pouch even better now as I can
use it without the flap or belt showing.

Thursday, January 28, 2016
How do you store your crafting tools and materials?
I often come across this question from other crafters, "How do you store your crafting tools and materials?"
I used lots of bead in my jewellery making hobby, so I use a rotating spice rack that comes with bottles to store my beads and head pins. I like it that the bottle is clear so that I can see what is stored in it. It is neat and does not take up too much space on my working table.


The beads I bought came in small plastic screw top jar like this that I can slip into my spice bottles.


I keep my crafting tools in tool box with trays like this.


Here are some other condiment caddies meant for your kitchen that you can consider using.
This is a coffee storage carousel for K-Cup Pods to consider using if you already have bottles like the ones above for spice, large enough to slot them in. There are also models available that can rotate.

This is meant for storing what you need for making coffee. I use knitting needles and rods to roll my wires, so, I could use the space for storing cups to keep them. I will have to put a container inside the slot to hold them neatly together.


I think it is good to be able to see what you use in your projects. You would not want to be caught in a bout of inspiration to discover that you are short of the material you need to complete your work.


Here is another see through example that I like. Since there is a cover, I will be able to carry it around with me. I like it that the space meant for storing ice can be used to hold my tools. The five containers are removable. So, if I buy more than a unit, I should be able to interchange containers of beads that I need for my current project.


How do you store your craft tools and materials?
The products that I share here can be purchased from Amazon.
I used lots of bead in my jewellery making hobby, so I use a rotating spice rack that comes with bottles to store my beads and head pins. I like it that the bottle is clear so that I can see what is stored in it. It is neat and does not take up too much space on my working table.
The beads I bought came in small plastic screw top jar like this that I can slip into my spice bottles.
I keep my crafting tools in tool box with trays like this.
Here are some other condiment caddies meant for your kitchen that you can consider using.
This is a coffee storage carousel for K-Cup Pods to consider using if you already have bottles like the ones above for spice, large enough to slot them in. There are also models available that can rotate.
This is meant for storing what you need for making coffee. I use knitting needles and rods to roll my wires, so, I could use the space for storing cups to keep them. I will have to put a container inside the slot to hold them neatly together.
I think it is good to be able to see what you use in your projects. You would not want to be caught in a bout of inspiration to discover that you are short of the material you need to complete your work.
Here is another see through example that I like. Since there is a cover, I will be able to carry it around with me. I like it that the space meant for storing ice can be used to hold my tools. The five containers are removable. So, if I buy more than a unit, I should be able to interchange containers of beads that I need for my current project.
How do you store your craft tools and materials?
The products that I share here can be purchased from Amazon.
Subscribe to:
Posts (Atom)

